
It’s almost time for Halloween already, so we asked our Diamond Salons if they wanted to create step by steps for you in this theme. And they didn’t disappoint us! Whether you’re a total fan of Halloween or not, these sets are tee fun! All sets contain simple salon nail art so you don’t have to plan extra time to recreate a set on your clients’ hands. Have fun reading and watching, and don’t forget to tag us (@urbannailsbv) on your socials if you’re into the Halloween theme as well!
Nail Couture & Academy
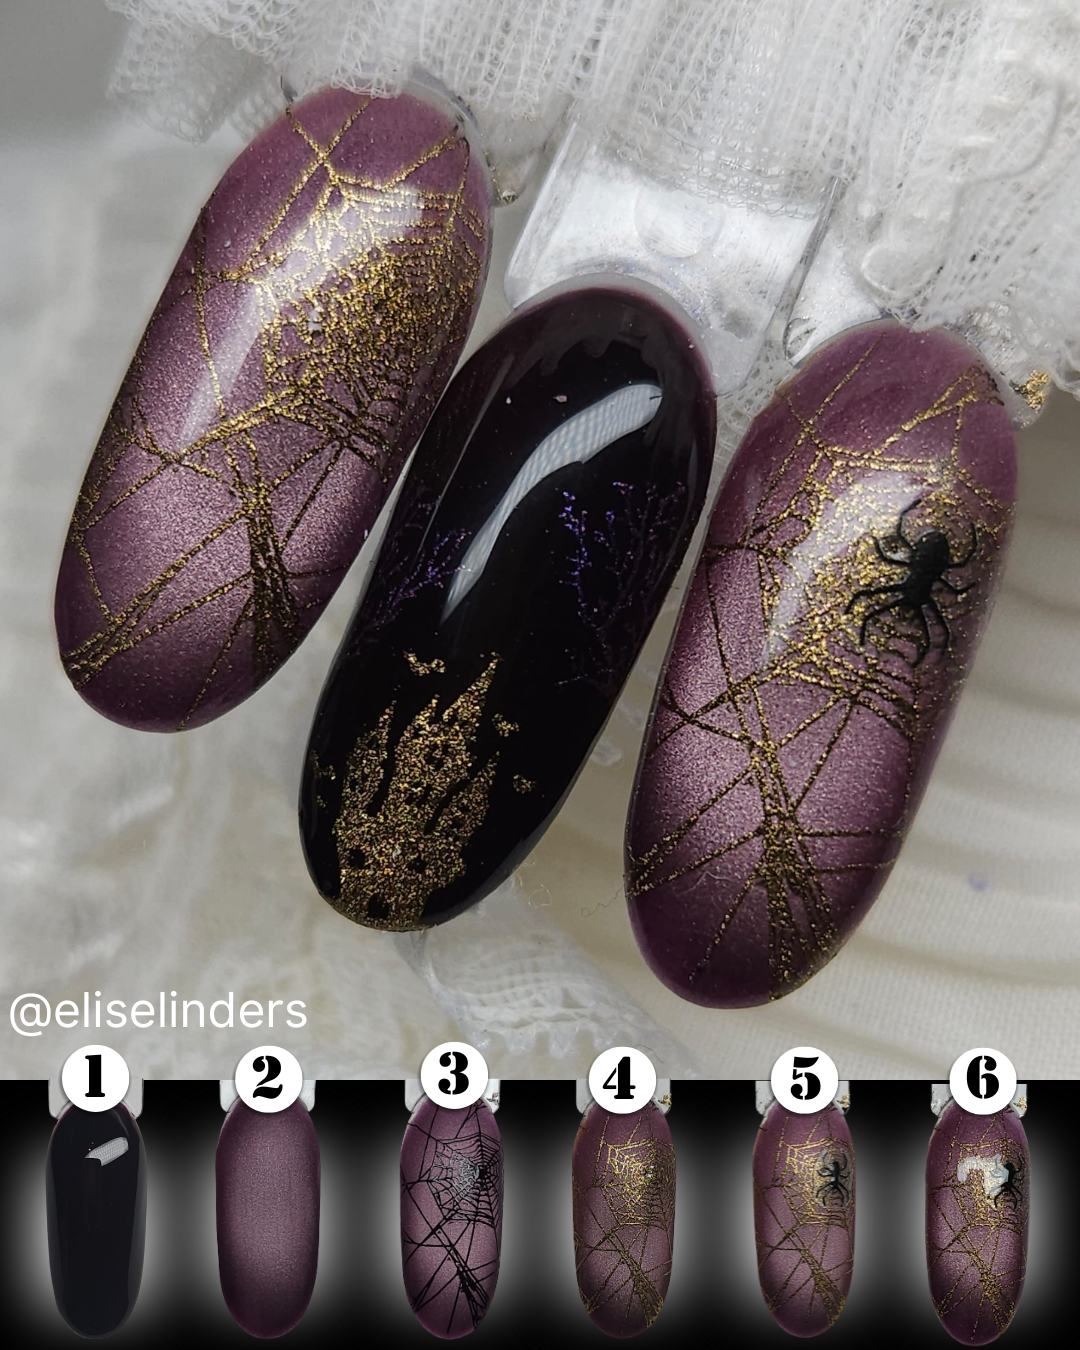
- Paint the entire nail with Gel Polish GP02B and cure it for 60 seconds in your UV/LED lamp.
- Now varnish the entire nail with the Cat Eye from the Drama & Darkness Gel Polish Duo, holding your Jerommeke left, right, in front of and behind the nail until you are satisfied and curing this too for 60 seconds in your UV/LED lamp. Finish with the Matte Gel and this too goes into the lamp for 60 seconds.
- Now you can start stamping the design, this image is from Moyra Stamping Plate 126. Use a stamp varnish with adhesive like SGP01.
- Use your Fluff Brush to apply the gold Chrome, cure this for 10 seconds in your UV?LED lamp.
- Peel the spider from the sheet of NASIV-03 nail art stickers with tweezers and place on the desired spot. press gently.
- Now apply a Top Gel of your choice and cure it for 60 seconds in your UV/LED lamp.
This design is finished!
- Paint the entire nail with the Cat Eye from the Drama & Darkness Gel Polish Duo, do not harden it yet.
- Use your Jerommeke Magnet to model the Cat Eye. Here I held the magnet on all 4 sides of the nail and pressed the Cat Eye particles in slightly.
- Using tweezers, gently peel a sticker from the sheet of the NASIV-01 and place it in the desired location.
- Complete with other nail art stickers and press firmly.
- Paint the entire nail with a Top Gel of your choice and cure for 60 seconds in your UV/LED lamp.
- Now add Spider Gel in thin random lines using your Nail Art Needle. Cure this for 60 seconds in your UV/LED lamp.
This design is finished!
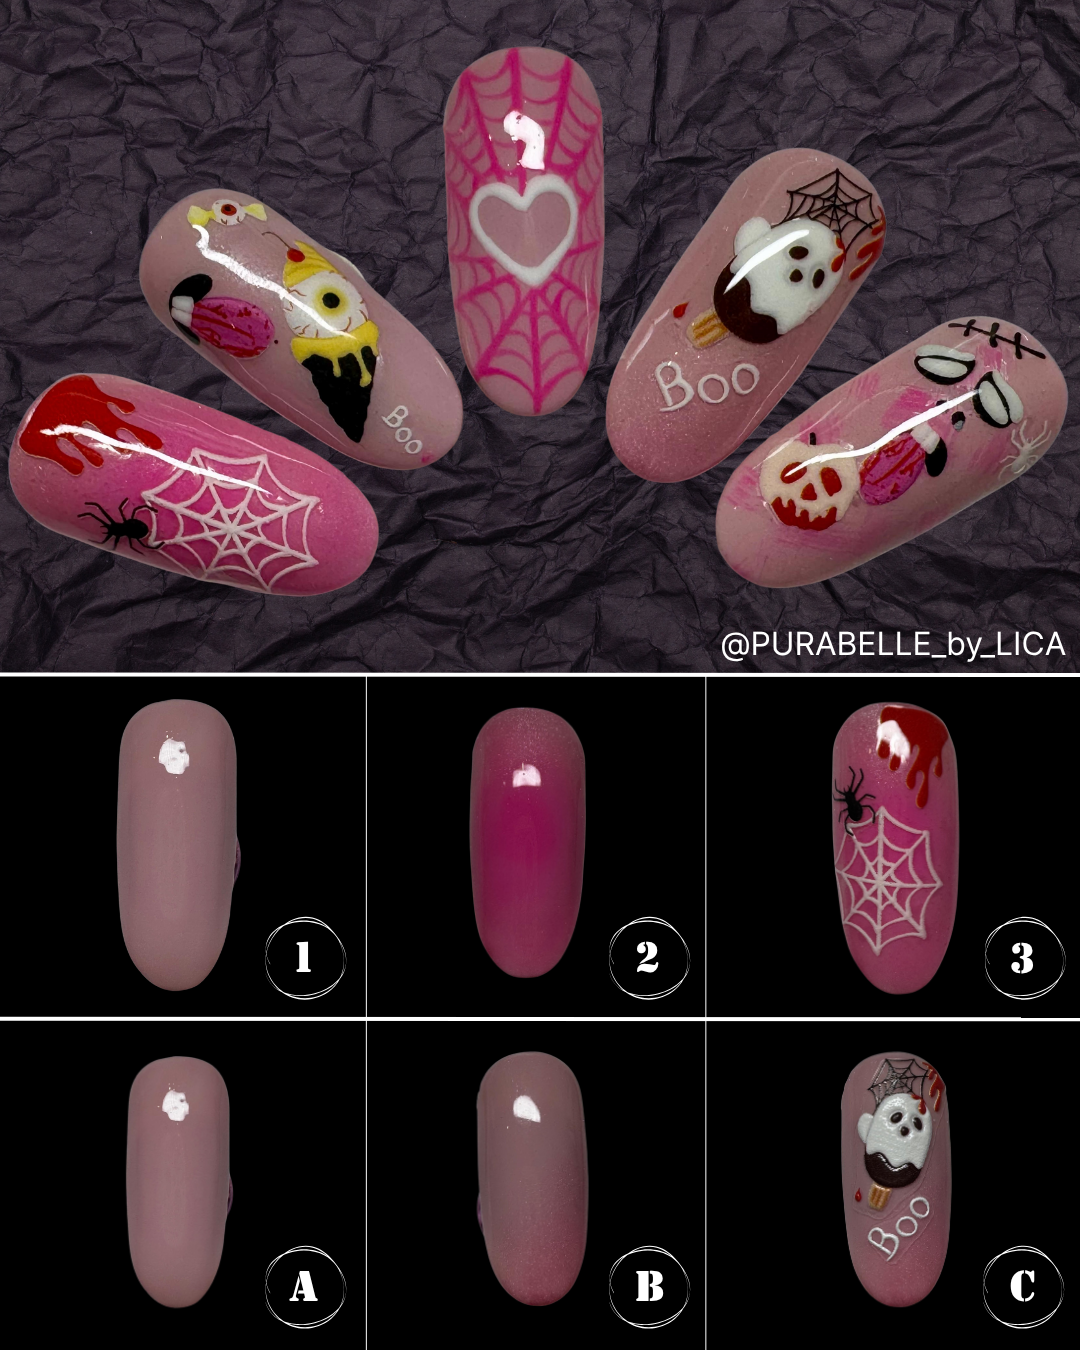
Purabelle by Lica
The following 4 designs were created by Lica Chiriac. She explains to us step by step how she created the designs:
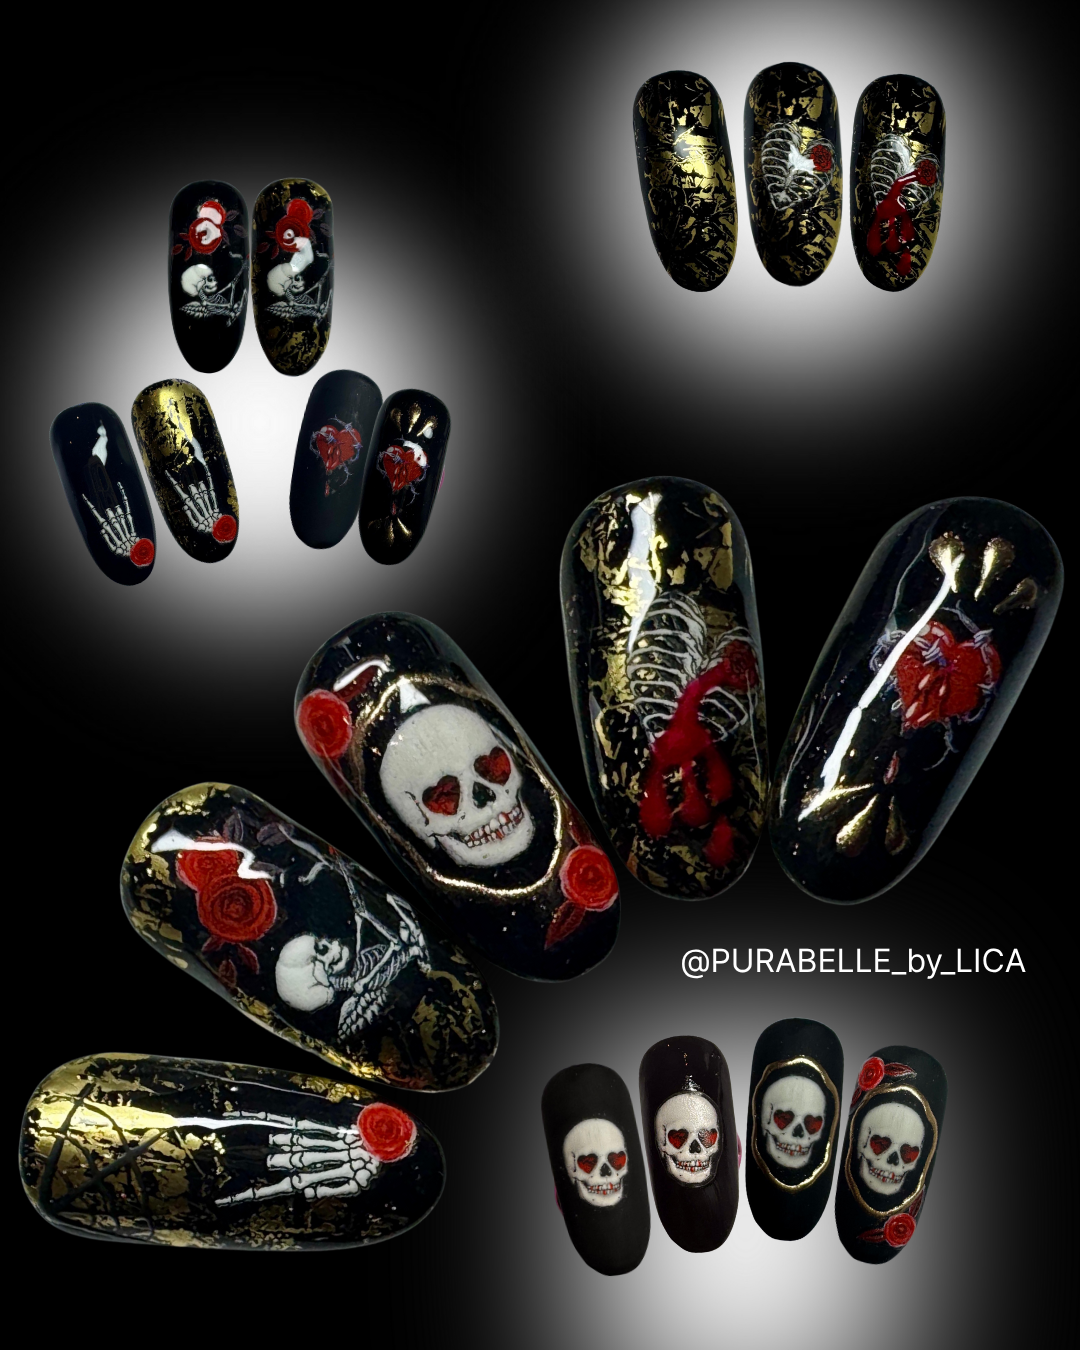
In large you can see here the full set I created, the smaller tips around it show step by step how the overall design was created.
The upper designs are made as follows:
- Paint the entire nail with Gel Polish GP02B and cure for 60 seconds in your UV/LED lamp.
- Take a piece of gold Pure Foil and gently press on a few places on the nail.
- Choose a sticker from NASIV-01 and place it on the desired spot, press firmly. (You can also swap steps 2 and 3).
The design on the bottom right starts with the same steps as above, finish this with a Matte Top Gel which you cure. After this draw with the Pro&GO NW03 a frame around the image, this you cure for 60 seconds in your UV/LED lamp. Brush Chrome pigment CH03 on this, if necessary you can now add stickers.
All nails can now be finished with a Top Gel.
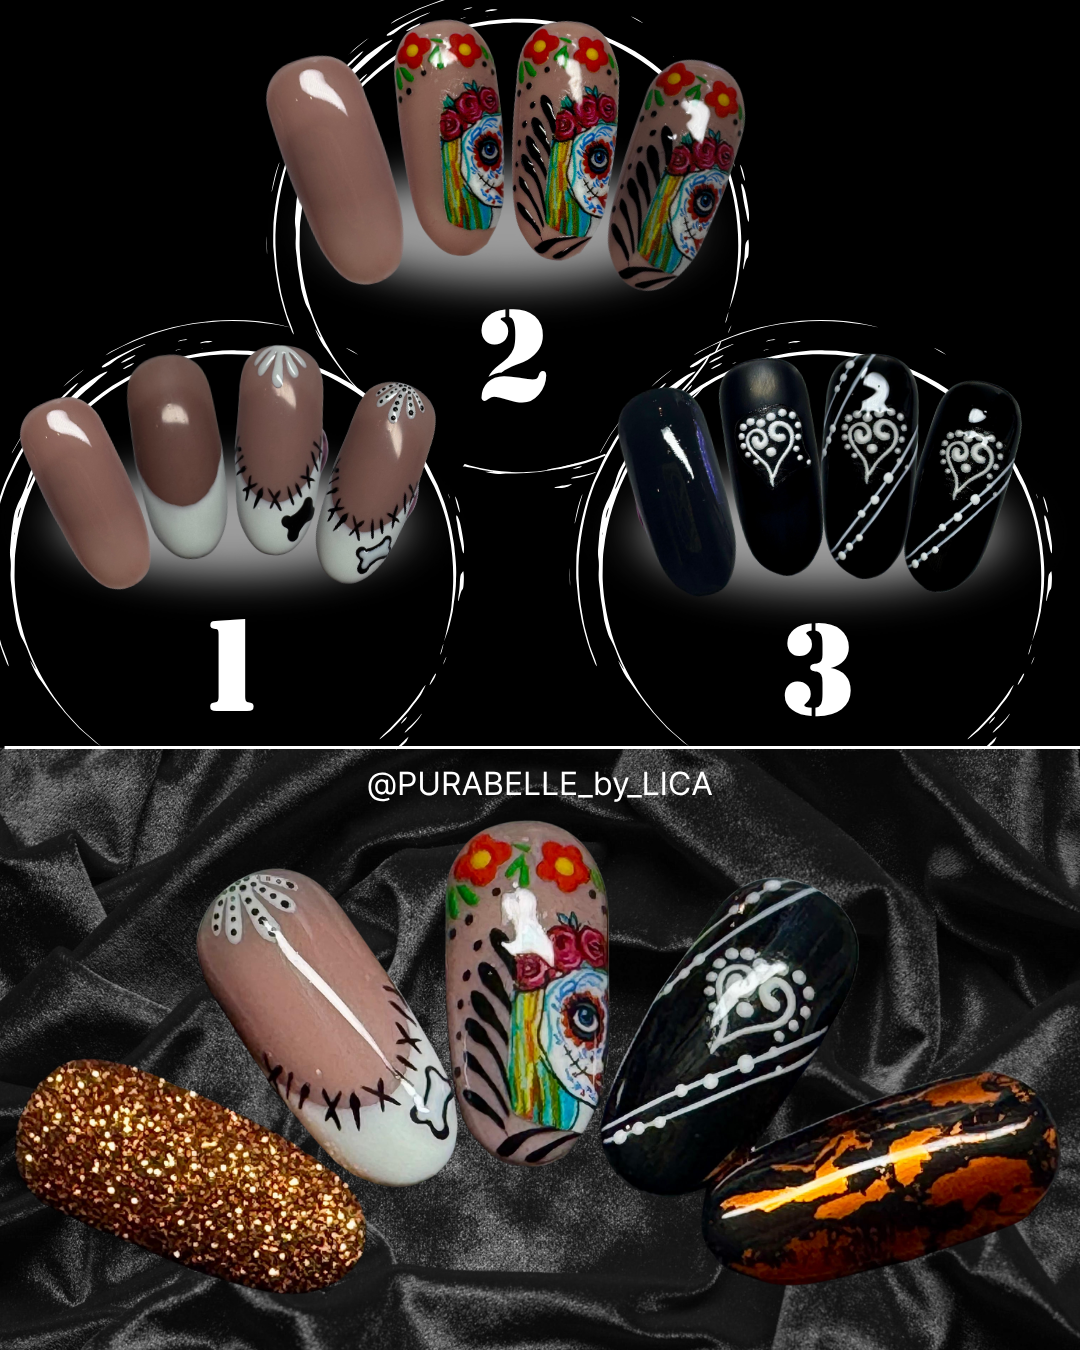
This design contains a little more steps, I’m going to try to keep it concise!
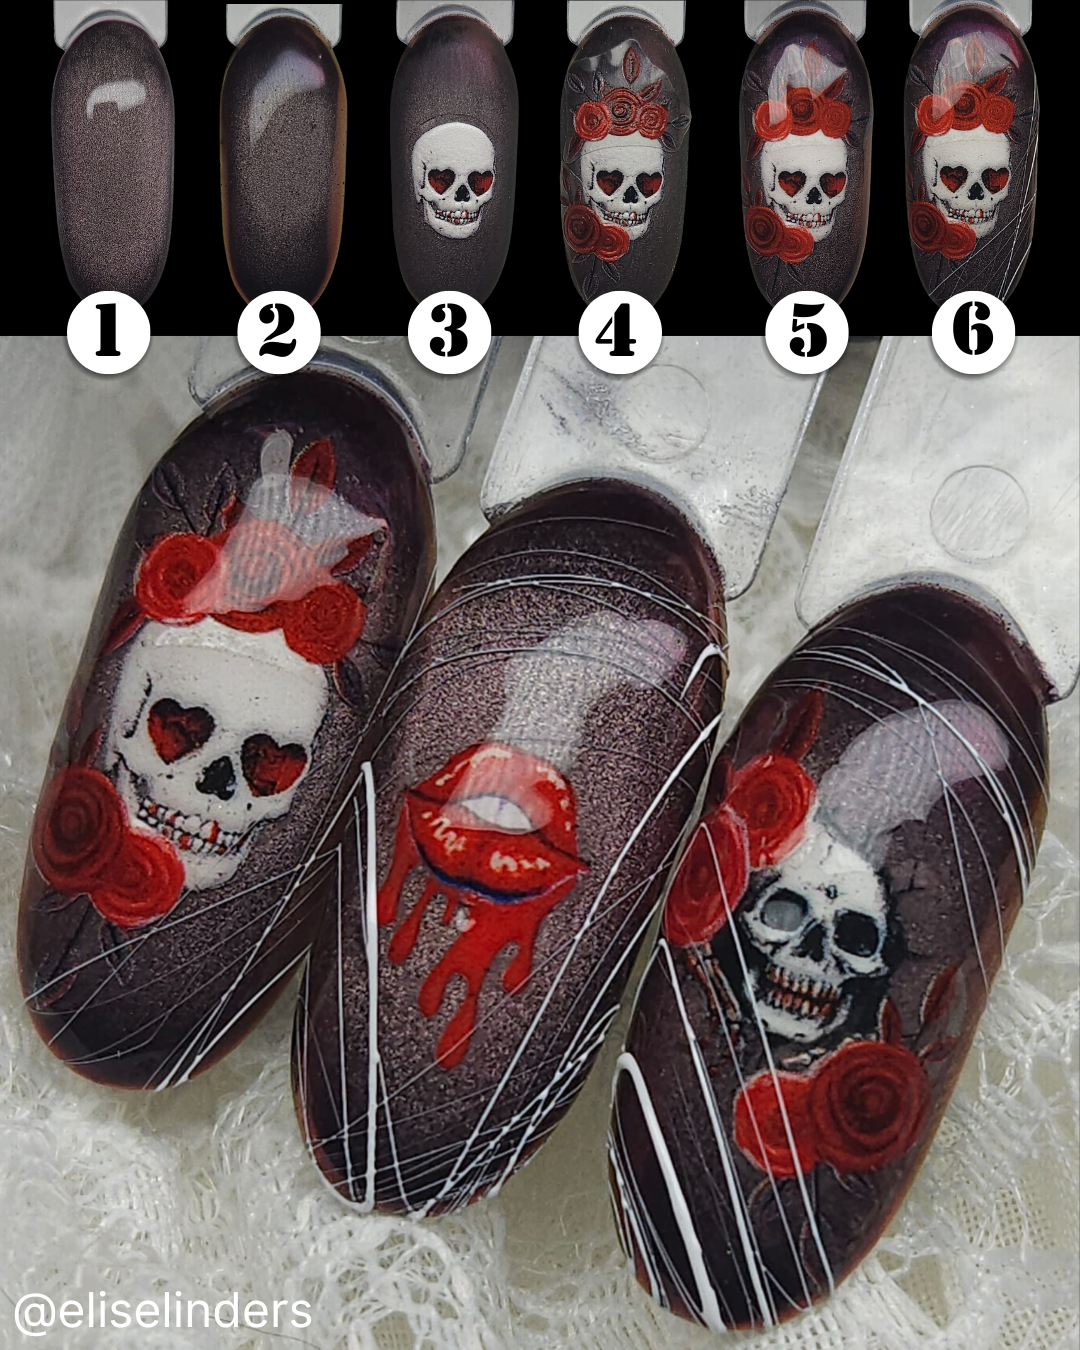
- Finish tip 1, 2 and 3 with Distri GP Valerie and tip 4 with Distri GP Roxane. Cure this in your UV/LED lamp.
- Repeat step 1.
- Stain tip 1 with the Distri GP Roxane and cure.
- Press a little Pure Foil on tips 1, 3 and 4.
- Now place a sticker of NASIV-02 on all 4 tips and press firmly.
- Lacquer tip 2 with a Matte Top Gel and cure it. Now draw a frame around the image with the
Pro & Go and cure it. On this you apply Super Mirror and cure this for 10 seconds in the lamp. - On tip 3, use the Pro & Go and Distri GP Roxane to draw the rest of the design and this will harden for 60 seconds in your UV/LED lamp.
All designs are now ready and can be finished with a Top Gel of your choice. This cures for 60 seconds.
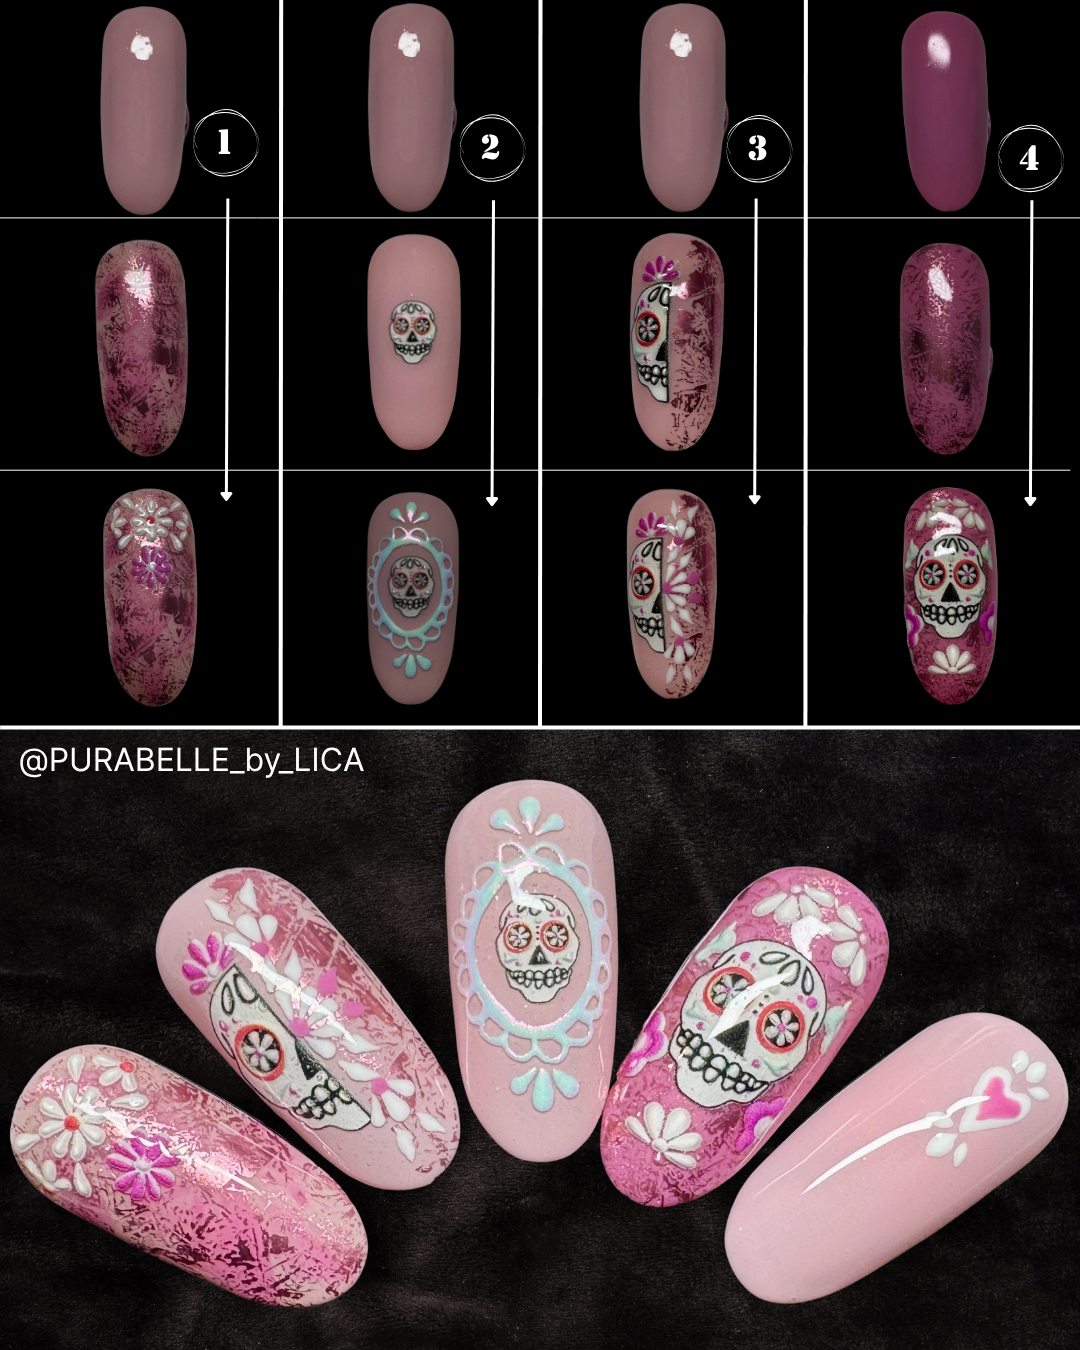
For this design, I will name the steps from tip 1 and tip 4.
- Paint both tips with Distri GP Valerie and cure in your UV/LED lamp (repeat).
- Now for tip 1, make a mix of Pure Pigment 53 and 58 and apply this vertically over the center of the nail with a Fluff Brush. For tip 4 use only Pure Pigment 58, apply this as an ombre from the bottom diagonally upwards, now cure both tips for 10 seconds in the lamp.
- Choose your desired stickers from NASIV-03 and place them on the tips, feel free to be creative and combine them. Press the stickers firmly.
- Coat both tips in their entirety with a Top Gel of your choice and cure under the lamp (60 seconds in UV/LED).
tip 1:
- Varnish the tip with Gel Polish GP06 and cure in the UV/LED lamp (2x).
- Make a french with Pro & Go NW01 and harden it.
- Draw the design with NW01 and NW02 and harden it.
- Add details with NW01 and 02 and harden out.
tip 2
- Start with a cured base of Gel Polish GP06.
- Choose one or more designs of Nail Art stickers NASIV-04 and place them on the nail, press the stickers firmly.
- Add details with Pro&Go NW02 and harden.
tip 3
- On a cured base of Gel Polish GP02B, place a sticker of NASIV-04 and press firmly.
- Finish the design with Pro&Go NW01, cure this.
Varnish everything with Top Gel, cure for 60 sec (UV/LED lamp).
Planet Beauty
Jony Joksch made these 2 designs and she explains to you step by step how they were made:
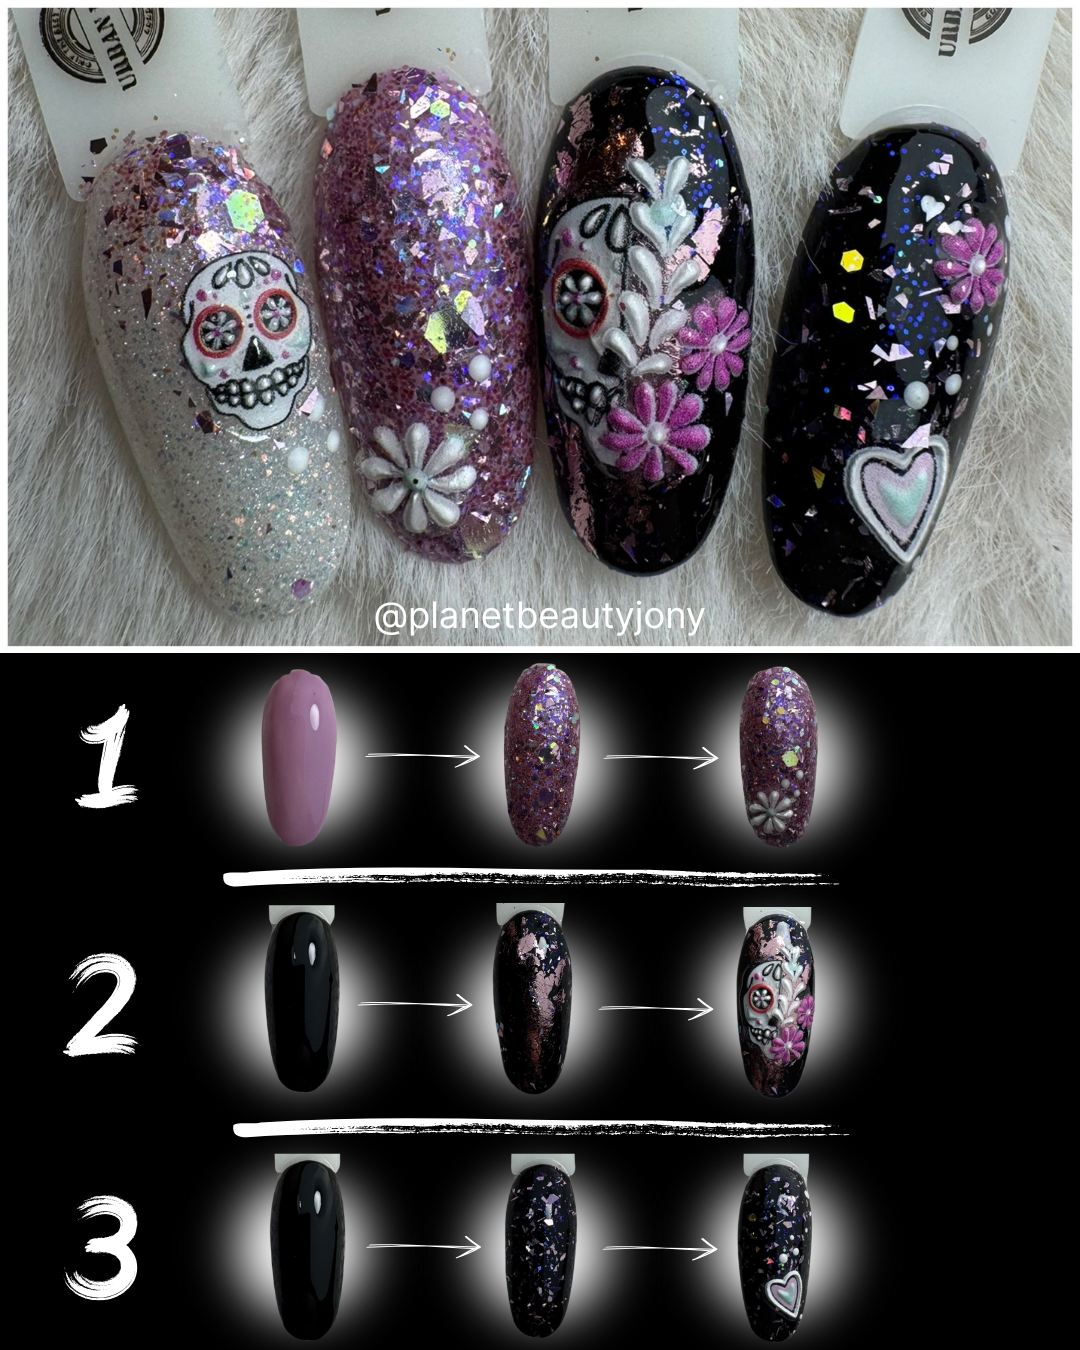
We’re going to multitask for these tips, because we’re going to do 3 at once!
- Paint tip 1 with Gel Polish Distri GP Roxane and the other 2 with GP02B and cure it in the LED UV lamp.
- Repeat step 1.
- For tips 1 and 3, apply Base & Top and sprinkle a glitter of your choice into the wet gel.
- At tip 2, gently press Pure Foil 16 into the adhesive layer. Cure all 3 tips for 60 seconds in the lamp.
- Paint all 3 nails with Base & Top and cure for 60 seconds in the UV/LED lamp. Remove the adhesive layer with Magic Prep.
- Choose Nail Art Stickers from NASIV-02 and place them (with tweezers) on the tips as desired.
- Coat all 3 tips with neXt Top Gel and cure for 60 seconds in the UV/LED lamp.
- On tip 3, place a few dots with Pro & GO NW01 using a dotting tool and cure for 60 seconds in the UV/LED lamp.
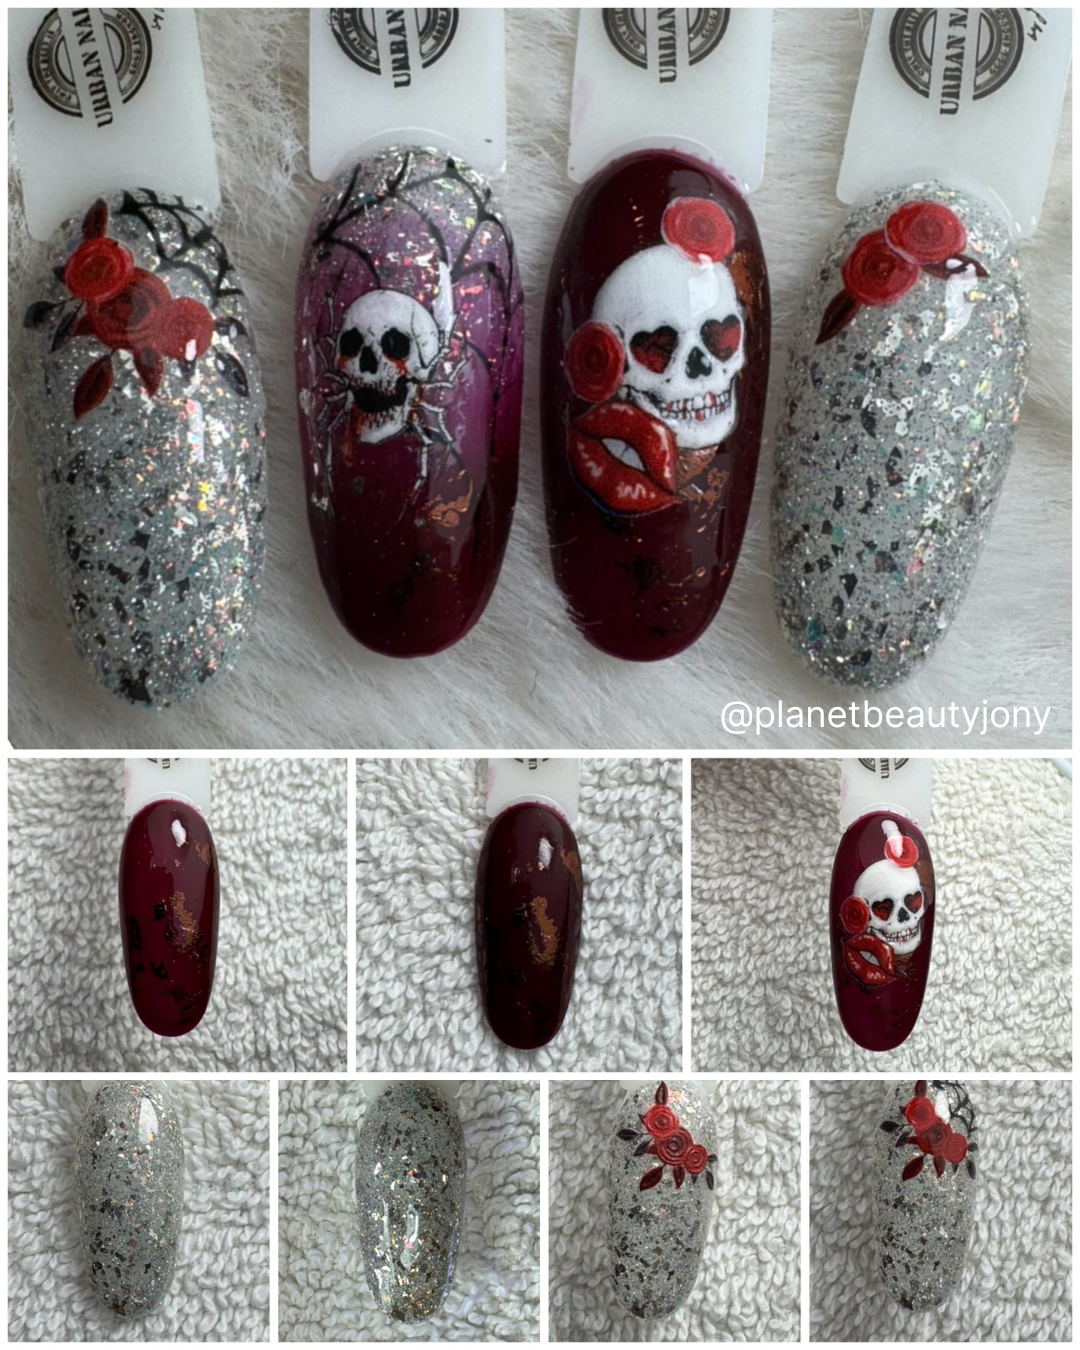
Tip 1:
- Lacquer the tip with Gel Polish GP23 and cure it for 60 seconds in the UV/LED lamp. (2x)
- Gently press Pure Foil 39 onto the adhesive layer of the gel polish.
- Lacquer the tip with Base & Top, cure it in the lamp and remove the adhesive layer.
- Apply Nail Art Stickers NASIV-01 as desired.
Tip 2:
- Apply a glitter Gel Polish of your choice, cure for 60 sec. in the UV/LED lamp. If necessary, repeat this step.
- Paint the nail with Base & Top, harden it in the lamp and remove the adhesive layer.
- Apply Nail Art Sticker(s) NASIV-01 and finish with Base & Top.
- Draw the spider web with Pro & Go NW02 and harden it in the lamp.
Varnish both tips with a topcoat of your choice.
We hope we gave you some nice inspiration with these step by steps. All designs can of course also be made with all our other nail art stickers, in case you are not a fan of this theme but still like the designs.
Lots of Nail Art fun!!!